History of Photography
Camera Obscura
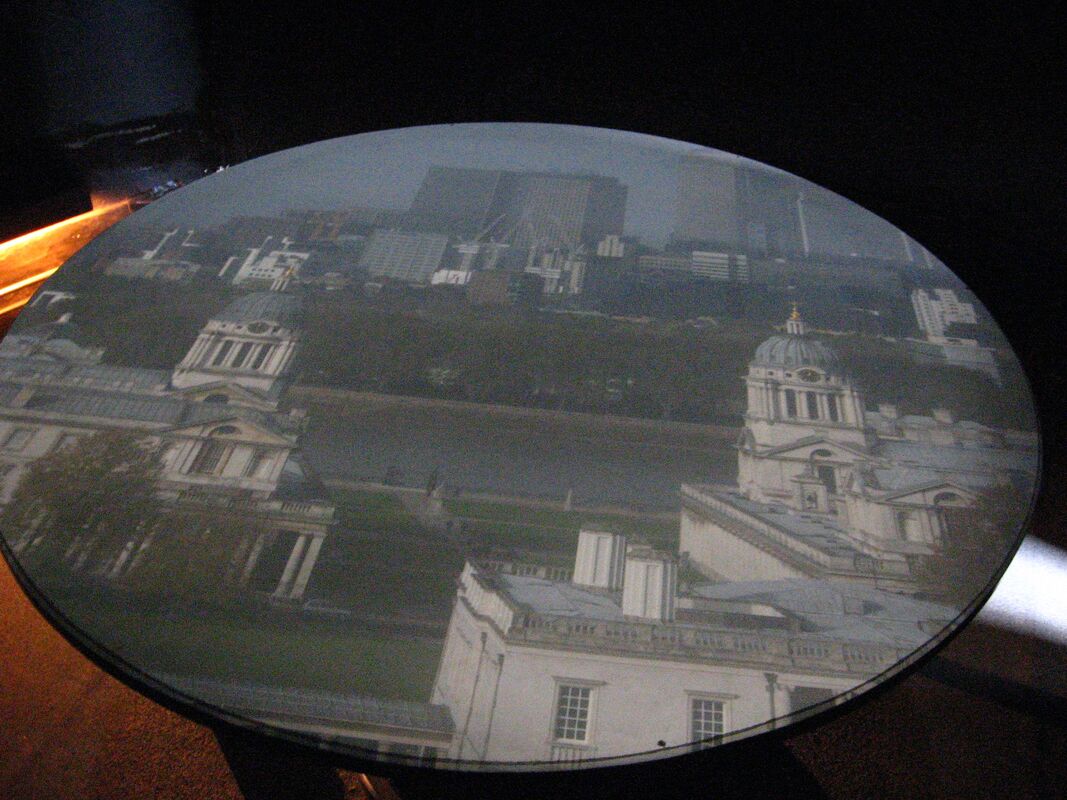
The photo above is the Camera Obscura in Greenwich
A Camera Obscura is the pre-curser of the photographic camera. The earliest versions, goes back to the 9th century AD, consisted of tiny darkened rooms with light entering through a single hole. The result was that of an upside down image of the outside scene was cast on the opposite wall, which were normally whitened. By the 16th century, to aid drawing; the subject was posed outside and the image reflected on a piece of drawing paper for the artist to trace. Portable versions were later developed, soon followed by smaller and even pocket models, the inside of the box was painted black and the image reflected by an angled mirror so that it could be viewed correct way up.
A Camera Obscura is the pre-curser of the photographic camera. The earliest versions, goes back to the 9th century AD, consisted of tiny darkened rooms with light entering through a single hole. The result was that of an upside down image of the outside scene was cast on the opposite wall, which were normally whitened. By the 16th century, to aid drawing; the subject was posed outside and the image reflected on a piece of drawing paper for the artist to trace. Portable versions were later developed, soon followed by smaller and even pocket models, the inside of the box was painted black and the image reflected by an angled mirror so that it could be viewed correct way up.
My Camera Obscura
|
|
I created my camera obscura by utilising a dark sugar paper, masking tape, a magnifying glass, tracing paper and scissors. I created black box with the sugar paper, used the masking tape to hold it together. I used the magnifying glass to create a effective focal length. The result being that I created a relatively sharp picture. What went well was the obstruction of the box. It would be better if I was able to tape the magnifying glass creating a sharper focal length.
|


DLSR Introduction
|
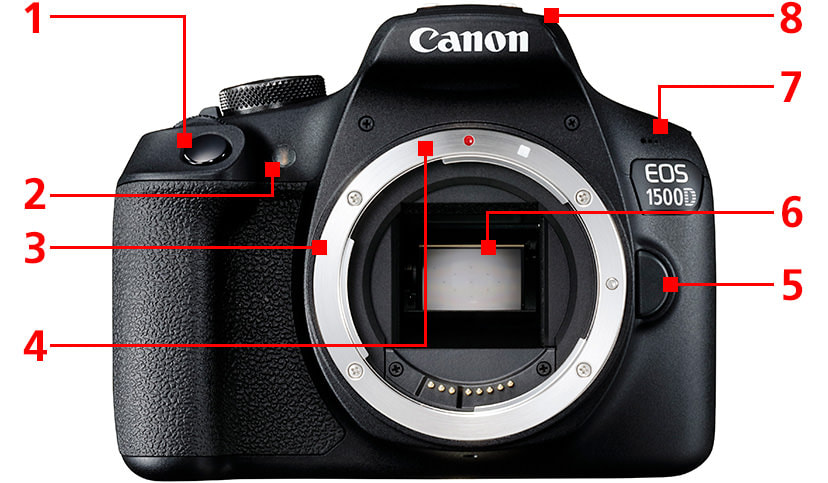
1)Shutter button
2)Red eye reduction/half-timer 3)Lens-mount 4)Lens mount index 5)Lens release button 6)Mirror 7)Microphone 8) Built in flash |
|
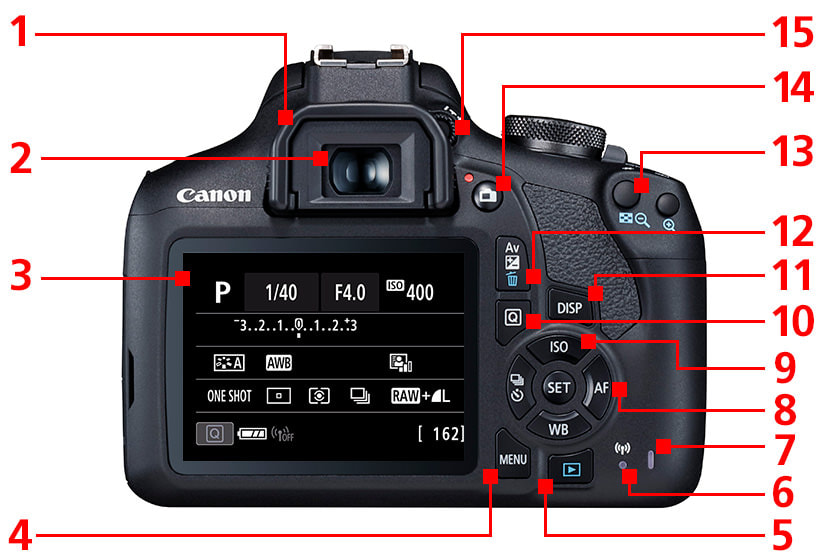
1) Eyecup
2) Viewfinder Eyepiece 3) LCD monitor 4)MENU Button 5)Playback Button 6)Wi-fi LAmp 7)Access Lamp 8)SET Button/Multi-controller 9)ISO Speed Setting Button 10)Quick Control Button 11)Display Button 12)Erase Butto 13)Focus Point Selection Button 14)Live View Shooting/Movie Shooting Switch 15)Dioptric Adjustment Knob thingymabob |
|
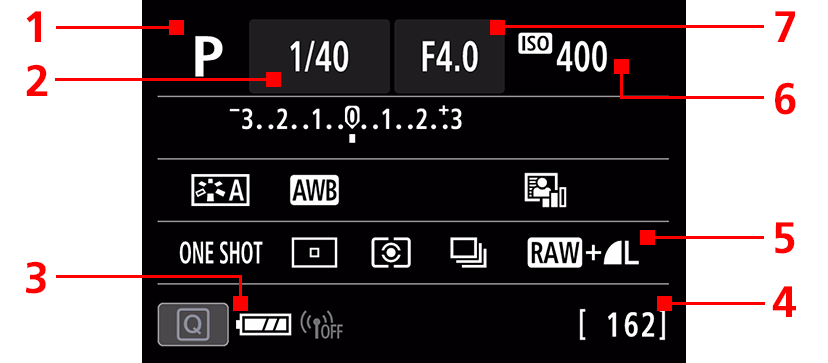
1)Shooting mode
2)Shutter speed 3)Battery level 4)Shots remaining 5)Image-recording format/quality 6)ISO speed 7)Aperture value |
Shutter speed
Shutter speed controls the amount of light that goes in and out of a camera. And is measured in fractions of seconds. The camera should be on shutter speed priority.
Second attempt
Levitation
In the theme of levitation I tried to capture photo, attempting to look like the person effortlessly floating of the ground, I try to avoid looking like the subject jumped. To do this I utilised a fast shutter speed, and various tactics that make it look like they are floating such as tying up long hair, tucking in loose clothes and trying to make your feet look flat.


I was inspired by yowayowa, a Japanese photographer who focuses on the theme of levitation.
Levitation Homework
Best attempts outside school, edited photoshop
Francesca Woodman
|
|
Woodman was born on April 3rd 1958 in Denver, CO,and her parents were artists, George Woodman and Betty Woodman. She went to a boarding school and started developing her interest in photography there. Woodman spent the summers with her family in Italy, and in 1975 Woodman started going to Rhode Island Design School in Providence .She returned to America in 1978 and graduated from RISD, then moved to New York the following year to pursue a career as a photographer. In 1980, Woodman became a resident artist at the McDowell Colony and continued to unsuccessfully send a portfolio to photographers. After an unsuccessful suicide attempt, Woodman lived in New York with her parents. Woodman applied to the National Arts Foundation, but was rejected, and on January 19, 1981, Woodman jumped out the window and died.
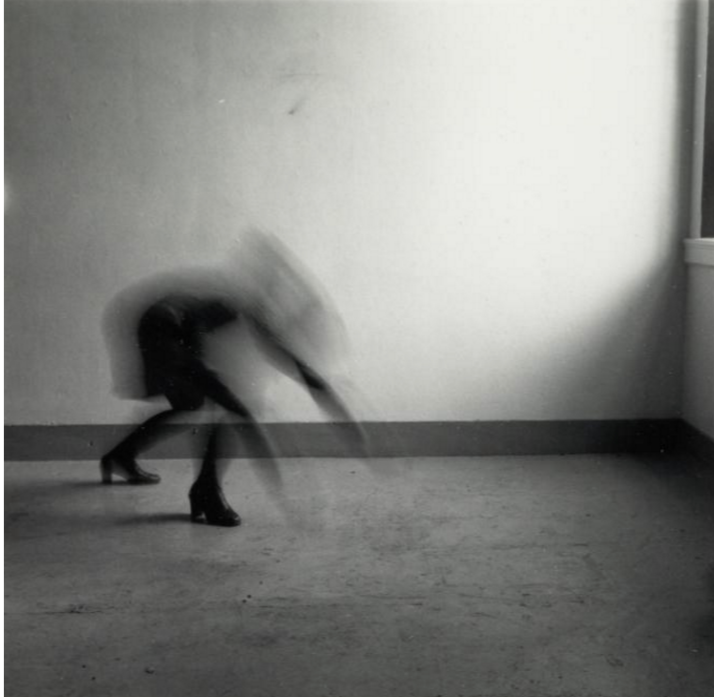
Francesca Woodman intended to create surreal and claustrophobic scenarios. She did this by concealing or encrypting her subjects, she wanted to reminded people that photographs flatten and distort. Francesca Woodman’s photographs explore issues of gender and self. This is shown by the fact that she is often hidden within her own photographs. She wished to explore the concept surrounding oneself. Woodman used long shutter speed and double exposure, this allowed her to form a ghostly impression of her work. The symbolic motifs she used to represent feminist ideologies.
Francesca Woodman intended to create surreal and claustrophobic scenarios. She did this by concealing or encrypting her subjects, she wanted to reminded people that photographs flatten and distort. Francesca Woodman’s photographs explore issues of gender and self. This is shown by the fact that she is often hidden within her own photographs. She wished to explore the concept surrounding oneself. Woodman used long shutter speed and double exposure, this allowed her to form a ghostly impression of her work. The symbolic motifs she used to represent feminist ideologies.
The slow shutter speed creates a blurry effect, helping add to ghostly theme that comes across in so many of Francesca Woodman photos. You also have a interesting contrast between her feet which are clearly defined and the rest of her body which is blurry.
I started to attempt to replicate Francesca Woodman style of photography, we used a slow shutter speed to create a blurry effect and to link to the theme of movement. I also linked it to ghostly theme as we went along.
My best edited attempts


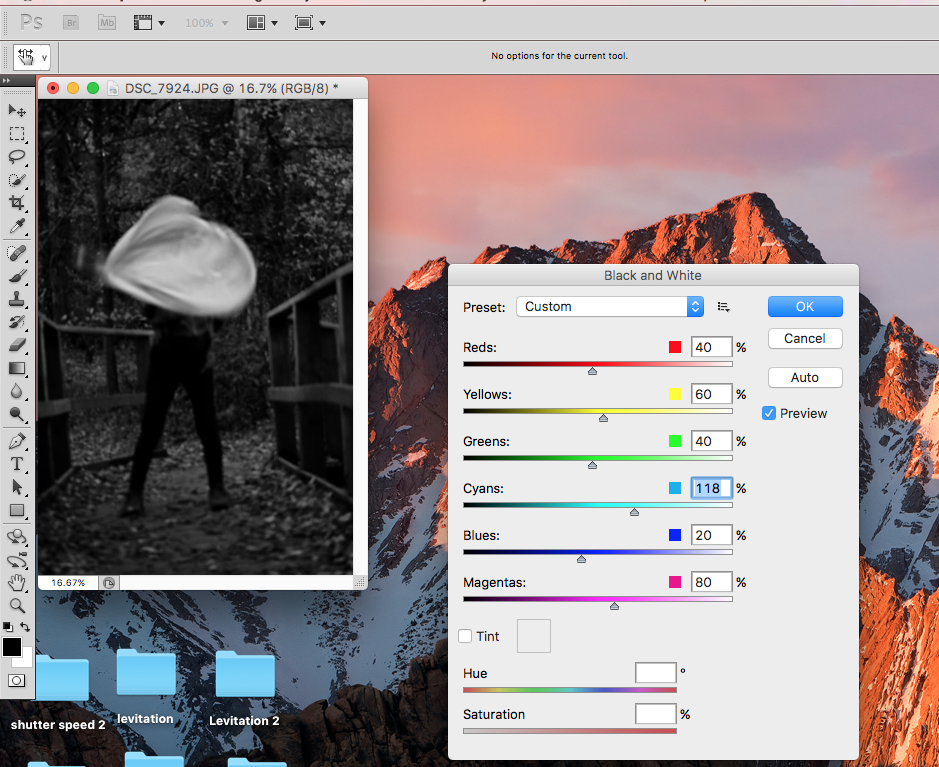
My editing process:
Image size
Exposure levels
Black and white
Image size
Exposure levels
Black and white
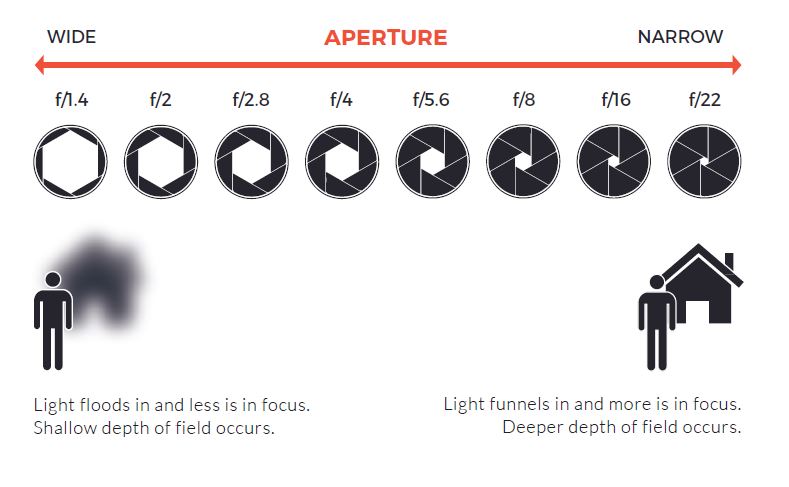
Aperture
Aperture is the hole in which light passes through in a camera. The wider the aperture the smaller depth of field of vision, the smaller the depth in the field of vision. Aperture is measured in F-stops, F standing for Focal length. The higher the F stop number the the smaller the depth of field, the lower the number the bigger the depth of field.
My attempts


from top to bottom to left to right
Attempt 1
f/4.5 1/1600 . ISO 400
f/25 1/50 ISO 400
f/13 1/160 ISO 400
Attempt two
f/4.5 1/800 ISO 400
f/29 1/20 ISO 400
f/13 1/ 80 ISO 400
Attempt 1
f/4.5 1/1600 . ISO 400
f/25 1/50 ISO 400
f/13 1/160 ISO 400
Attempt two
f/4.5 1/800 ISO 400
f/29 1/20 ISO 400
f/13 1/ 80 ISO 400
I believe my use of the aperture was relatively successful, however the composition needs improving.
Composition
In this task we were sent around the school looking for patterns/items that mimicked the grid below. Whilst I was looking for items that reflected the worksheet, I also tried to capture colourful photographs so as to make them stand out more clearly.
Finally you have my finished work, it was edited in photoshop.
When I was looking for the outside taking photos I would generally look at the sheet and then begin scanning my surroundings, for objects that where roughly the same shape. When looking for photos I would bare in mind how to crop and rotate them so they would posses closer likeness to the object, a good example of this is the triangle on my grid, when I located it in real life it was not in fact a triangle but rather a diamond to achieve the ideal shape I simply only photographed the top half of the diamond.
When I was looking for the outside taking photos I would generally look at the sheet and then begin scanning my surroundings, for objects that where roughly the same shape. When looking for photos I would bare in mind how to crop and rotate them so they would posses closer likeness to the object, a good example of this is the triangle on my grid, when I located it in real life it was not in fact a triangle but rather a diamond to achieve the ideal shape I simply only photographed the top half of the diamond.

|

|
I used aperture to make the cross in the centre, stand out clearly against the background. I believe for the most part the composition was quite successful with an exception of the 'I' like shape in the bottom left corner of the sheet, where I believe the composition required further alterations. I regard the colours as a pleasant feature of the photo, as it allows my photos to stand out more clearly.
